Introduction
Trusses are one of the most vital components in modern construction, especially when building roofs. They provide structural support and are essential for the durability of your home or any building. But how do you install a truss correctly? If you’re a DIY enthusiast or a construction professional looking to hone your skills, this step-by-step guide will show you how to install a truss the right way.

What Is a Truss?
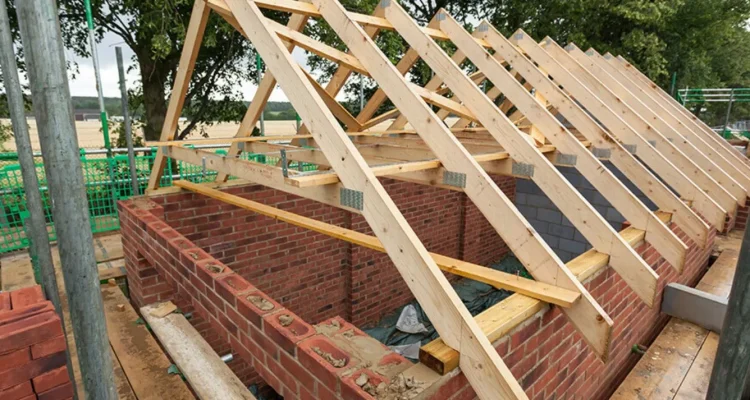
A truss is a framework consisting of triangular units, often made from wood or metal. These triangular units distribute the weight of the roof and other forces evenly, ensuring the structure’s stability. Trusses are commonly used in roof construction to support the roof’s weight and to maintain its shape.
Importance of Proper Truss Installation
Correct truss installation is essential to ensure the stability of a roof. Poor installation can lead to structural damage, safety risks, and potential collapse. Ensuring that you follow the right procedures when installing a truss will help you avoid costly mistakes and ensure your structure remains safe and sound for years to come.
Tools and Materials Needed
Before diving into the process, it’s important to gather all the necessary tools and materials.
Essential Tools for Truss Installation
- Hammer or nail gun
- Measuring tape
- Carpenter’s square
- Chalk line
- Ladder or scaffolding
- Safety harnesses and personal protective equipment (PPE)
Materials You’ll Need
- Pre-fabricated trusses
- Nails or screws
- Metal connectors (if applicable)
- Roofing sheets (for later stages)
Preparation Before Installing the Truss
Preparation is key when it comes to installing trusses. Skipping this stage can lead to alignment issues or faulty installations.
Understanding Building Codes
Before installing trusses, it’s crucial to familiarize yourself with local building codes and regulations. These codes dictate how trusses should be spaced, secured, and what materials should be used. If you’re unsure, it’s always best to consult with a local building inspector or hire a professional.
Checking the Truss Design and Layout
Every construction project is different, so ensure the truss design matches the layout of your building. Verify the design plans and spacing requirements for your trusses before starting the installation process. This will prevent unnecessary adjustments once installation has begun.
Step-by-Step Process to Install a Truss
Now that you have all your tools, materials, and plans ready, let’s move on to the installation.
Step 1: Preparing the Job Site
Ensure that your job site is clean and clear of any obstacles. Having a clutter-free workspace will make it easier and safer to install the trusses. Make sure that the building’s walls are level and secure as well, as this will affect the stability of the trusses.
Step 2: Setting Up the Trusses
Before lifting the trusses into position, lay them flat on the ground near the installation site. This allows you to inspect each truss and ensure they’re free from defects. If you’re using pre-fabricated trusses, check that they meet the specifications for your project.
Step 3: Securing the First Truss
The first truss sets the foundation for the rest of the installation, so it’s crucial to get it right. Lift the first truss into place and position it at one end of the building. Secure it temporarily using braces or ropes to hold it upright while you adjust its alignment.
Step 4: Aligning and Installing Remaining Trusses
Once the first truss is secured, you can start installing the remaining trusses. Use a chalk line to ensure each truss is properly aligned with the building’s layout. Lift each truss into place, making sure it is spaced evenly according to your design plan. Temporary bracing can be used to keep the trusses steady as you work.
Step 5: Installing Bracing for Extra Stability
Once all the trusses are in place, install bracing to provide additional stability. Cross-braces and diagonal bracing will help keep the trusses from shifting or wobbling, especially during extreme weather conditions.
Common Mistakes to Avoid When Installing a Truss
Installing trusses can be tricky, and mistakes can lead to serious structural problems down the road. Here are some common pitfalls to watch out for:
Overlooking Building Codes
Building codes exist for a reason, and failing to follow them can result in a roof that isn’t safe or up to standard. Always ensure that your truss installation meets local code requirements.
Failing to Secure Trusses Properly
Improperly secured trusses can shift or collapse over time, especially in high-wind or heavy snow areas. Make sure every truss is securely fastened with nails, screws, or metal connectors, and double-check your work as you go.
Safety Tips for Truss Installation
Installing trusses involves working at heights and handling heavy materials, so safety should always be your top priority.
Working at Heights
When working on a roof or elevated platform, always use ladders or scaffolding that meet safety standards. Wear a safety harness and ensure it’s properly secured to prevent falls.
Using Personal Protective Equipment (PPE)
Always wear the appropriate personal protective equipment (PPE) when installing trusses. This includes hard hats, gloves, safety glasses, and sturdy footwear. Proper PPE can protect you from injuries caused by falling objects or sharp edges.
FAQs
How Long Does It Take to Install a Truss?
The installation time depends on the size and complexity of the project. For a standard home, truss installation can take anywhere from a few hours to a full day.
Can I Install a Truss Without Professional Help?
While it’s possible to install trusses without professional help, it’s highly recommended to have experienced hands on deck due to the complexity and safety concerns involved.
What Is the Lifespan of a Roof Truss?
With proper maintenance, roof trusses can last for decades, often up to 50 years or more, depending on the material used and environmental conditions.
What Are the Different Types of Trusses?
Common types of trusses include King Post, Queen Post, and Fink trusses. Each serves a different purpose and is suited to different types of buildings.
How Can I Tell If a Truss Is Properly Installed?
A properly installed truss will be securely fastened, aligned according to design plans, and will meet local building codes. It’s always a good idea to have a professional inspect your work if you’re unsure.

Conclusion
Installing trusses is a critical part of any construction project, and it requires careful planning and execution. By following this step-by-step guide, you can ensure that your trusses are installed correctly, safely, and in line with local building codes. Properly installed trusses will provide the necessary support for your roof, ensuring the structure remains safe and durable for years to come.
Congratulation!